Travelmarks-photography... More than photography trips!

More than photography trips

Contact here
Posts by

Mark Brands

Photography Tips

How does focusing with a camera work?

Focusing with your camera

How does focusing work with your camera? There are several settings you can use on your camera. Let's go through them:
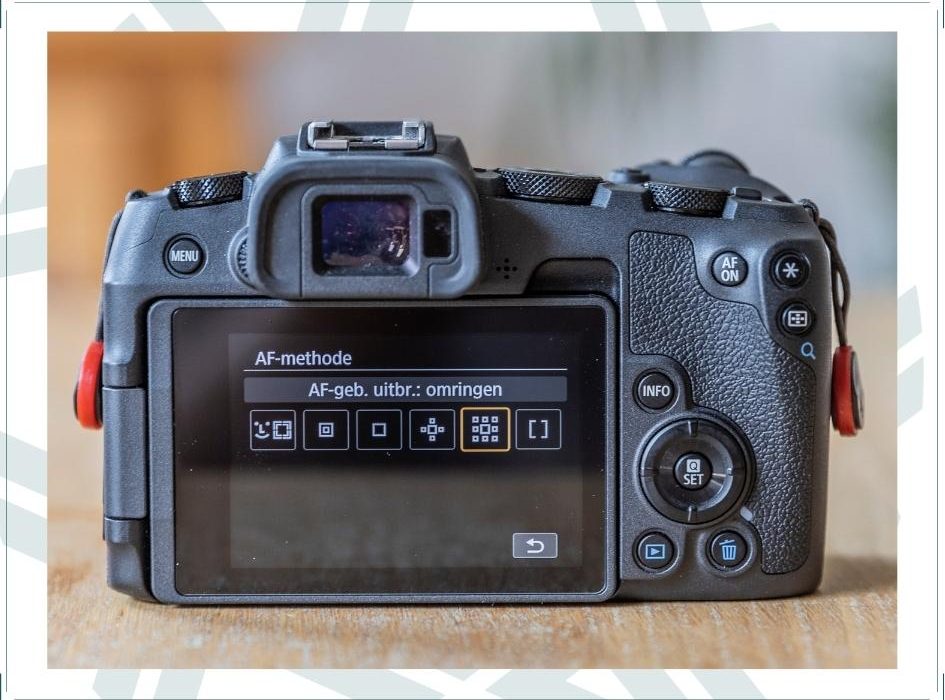
 

AF method

Something you've used before, but how does it actually work? When taking a photo, we press the shutter release button of the camera halfway. We see through the viewfinder or on the screen, one or more dots light up and press the button further to take the photo.

Focusing is done in a fraction of a second. The speed of focusing also depends a bit on the camera and lens combination.

Focus point

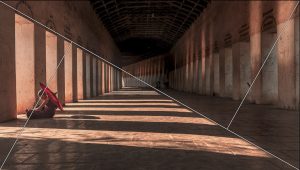
Not the entire image is linked to the AF sensor, but only a few focus points. That varies from 11 to more than 500. You see these focus points as dots or zones in the viewfinder of the camera. The middle point is the most sensitive. This measures both the horizontal and vertical contrast with an extra high sensitivity, in less light or low contrast. You can purposefully select one focus point, but you can also use an entire zone.

Many photographers use the center focus point and reframe the image, then take the picture. You can also choose to choose a different focus point, but then you have to focus properly for each photo. There is also a mode where all focus points are active and the camera chooses a point itself. This is by far the fastest method, but can result in a photo where the wrong element in your photo is in focus.

One shot / Ai Focus / Ai Servo

With One Shot, the focus point is locked when the focus point is found. So this mode is ideal for shooting still subjects.

Ai Focus recognizes it when movement comes from a still image. It then tracks the moving subject to focus. If something accidentally passes by, it can be detrimental, because you don't want to focus on the moving subject at all.

Ai Servo is the ideal mode if you have continuously moving subjects that you want to focus on. For example, think of a sports competition or car races. The focus point then continues to move with your subject.

Auto focus in liveview
With newer cameras with a touchscreen, it is possible to tap your focus point on your LCD screen. In this way you are no longer tied to the number of focus points that you see through your viewfinder, but you simply tap the subject you want sharp in your photo.

Autofocus vs manual focus:

Your camera has trouble focusing automatically in the dark. The camera will not find a bright spot to focus on. This is not a disaster, because fortunately we can also focus manually. Also with macro photography you will often want to focus manually. So good to pay attention to!

If you focus manually, keep a few points in mind:

  • Turn off the image stabilization on your lens
  • First, determine a good composition and place your tripod in the desired location.
  • Set your desired aperture, shutter speed and ISO.
  • Always take a test photo first and judge if it is good.
  • Macro photography is all about details. So make sure you have good focus to make sure that the right element of your photo is in focus.
  • Use the infinity sign (see photo on the right) for the largest possible sharpness area. You can recognize the infinity sign by an 8-like symbol. Adjust to this and turn back a very small turn. How much exactly? That differs per lens. So just try it out.
  • Take your photo and check whether you have the desired sharpness.
  • After each photo taken, you have to manually focus again. Every change in composition or setting creates a new situation. So refocus.
To manually focus via your LCD screen:
  • All of the above points also apply to manual focusing via your LCD screen.
  • On your LCD screen you can see more clearly what your photo will look like and whether it is sharp.
  • You are looking for a bright light source on your LCD screen. This can be anything, a lamppost, an illuminated shop front, a shop window, you name it.
  • Zoom in on the light source with your magnifying glass and focus manually. You can clearly see when it is at its sharpest on your LCD screen.                                      
Want to learn photography or brush up on your own photography skills?

Sign up for one of the many workshops!

Till clicks!

Photography Tips

Shooting with a tripod

Why is the tripod so important?

Tripod and ball head

Let's call it right, right away. This is one of the most important elements in photography. Your tripod is like your best friend! If you invest well in it, it won't let you down! So it's important to dwell on this for a moment.


Why is the tripod so important?

  • It gives stability.
  • You can take long exposure shots that you need for macro photography around twilight.
  • You reduse noise due to too high ISO values.
  • Without a tripod, no sparkling sharp photos.
  • The best results with focus stacking

What do you consider when buying? My tip, in any case, don't cut corners. Assume that you will once again purchase a new camera or lens and that your tripod must be able to carry it. Do you travel a lot? Then you would like a lightweight. Do you shoot a lot of macro? Then you want a tripod that comes close to the ground. For each type of photography, you can ask yourself what requirements your tripod must meet.

What questions you should definitely ask yourself:

  • What kind of photography do I use it for?
  • What is the total weight of my camera and lens? The heaviest version of course!
  • Do I want to expand in my lenses and what does my camera with lens weigh?
  • What requirements do I place on the tripod head?
  • When I go out, how much should the tripod weigh so I can take it comfortably with me?
  • What height should the tripod be?

  Tripod

There are various types of tripods on the market. You have very compact ones, such as a gorillapod and even a tripod on one leg, called a monopod. Feel free to research this on the internet. In general, however, we focus on the tripod, as this is the best variant.

The tripod stands firmly on three legs, as the name suggests. More expensive models are usually made of durable and sturdy materials. These tripods are very sturdy. Constant adjustment is also no problem for these tripods. They can be loaded more heavily. Pay attention to the weight of the tripod if you want to walk longer distances. You don't want to carry around too many pounds. Also think how big you are. It is pleasant to shoot when you have the camera at eye level on a tripod.

Remember: the heavier the weight, the more stable the tripod will be. Pay attention to the weight of the tripod if you want to walk longer distances. You don't want to carry around too many pounds.

Tripod head

A tripod head is available separately, which gives you flexibility. We discuss two types of tripod heads.

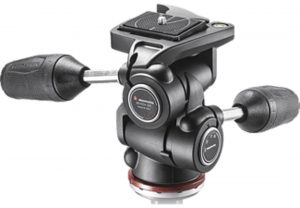
The most famous is the three-way head. You can move the three-way head in three ways: forward or backward, clockwise or counterclockwise, horizontally or vertically. This allows you to aim your camera extremely accurately. This can be done with levers, but also, for example, with rotary knobs where you can turn your tripod head per millimeter. three-way head

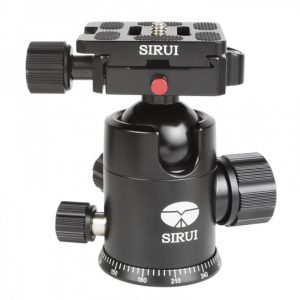
The second commonly used head is a ball head. It consists of a ball construction so that you can easily and quickly put your camera in the desired position with one lever. It is important with both models that the ball head must be able to bear the total weight of your camera and lens. Play it safe and rather add two kilos on top.

Other tips:

Some tips I don't want to withhold from you.

  • Cheap is expensive. It is a one-time purchase that you will enjoy for years to come.
  • Take good care of your tripod. This extends the lifespan.
  • Turn off the image stabilization on your lens. This ensures better sharpness.
  • In the camera menu, turn off noise reduction for slow shutter speeds. If necessary, you can apply this afterwards with editing.
  • Look closely at the environment. Placing your tripod a meter further can give a completely different perspective.
  • Make sure your tripod is stable and cannot tip over.
  • Cover the viewfinder to avoid unwanted rays of light.
Want to learn photography or brush up on your own photography skills?

Sign up for one of the many workshops!

Till clicks!

Photography Tips

How to photograph fireworks?

 Photographing fireworks

Okay, before we get to the fireworks, let's take a look at the BULB mode. You'll find the BULB mode if you continue to dial in the shutter speed setting when you get to the 30 second mark. You may even have a separate BULB setting on your camera.

The BULB mode allows you to determine your own shutter speed, even to infinity. Extremely useful if at 30 seconds you still have too little light, then BULB is your solution. However, it has another special feature and we need it for fireworks photography. Incidentally, photographing lightning works the same as fireworks. So two birds with one stone!

How does it work?

In BULB mode, you decide when to start recording and when to end recording. You press the button, the recording starts, you press the button again, the recording stops. So you can start recording and stop recording right after the fireworks (or lightning). A remote control is handy and recommended to avoid motion blur from pressing the shutter button. You'll get some additional tips along the way.

Other tips for photographing fireworks

  • Turn off the image stabilization on your lens (including autofocus).
  • First, determine a good composition and place your tripod in the desired location.
  • Set your desired aperture, shutter speed and ISO. I recommend an aperture between F8 and F14, for a large area of focus. Keep your ISO as low as possible, fireworks themselves give off a lot of light. A shutter speed between 1 and 5 seconds should be fine.
  • Always take a test photo first and judge if it is good.
  • Use the infinity sign to focus manually.
  • If you change your composition or settings, refocus.
  • Use the BULB mode to have complete control over shutter speed.
  • If you have a remote, use these.
  • Include the environment in your composition. Fireworks are beautiful. In perspective with, for example, a part of a city, it comes into its own even better.
  • En last but not least, stay safe!

Want to learn photography or brush up on your own photography skills?

Sign up for one of the many workshops!

Till clicks!


Photography Tips

How do you photograph the stars?

Photographing the stars

In the Netherlands we are not so topographically blessed to photograph the starry sky, but of course it is possible! In any case, it is a wonderful sensation!

Timing is key. We need a new moon (the light from the moon gives too much light pollution so we can't see the stars well) and clear skies. So no clouds. If those conditions are right...on your way!

Photographing stars is a different sport. You have to deal with the rotation of the earth, so you can not use too slow shutter speeds. A slow shutter speed will cause a star to change into a line due to the rotation of the earth. The following formula works:

500 / (focal length x crop factor) = maximum exposure time in seconds.

Example: fullframe body / 24mm lens = 500/24 = 20 seconds shutter speed. Not a fullframe? Multiply your crop factor (1.5x) by 20 seconds.

To get the stars visible you want to use as open an aperture as possible, for example f 2.8 or f 1.4. Also, increase your ISO value. Test this on the spot how much ISO you need. Normal values are between 1200 and 3200.

See if you can create a nice foreground. If necessary, light it a little with a flashlight to make it visible. Possibly take two pictures that you later join together. This can be in panorama to get both your foreground and sky in the picture. But it can also be done by blending to get the right exposure between foreground and stars.

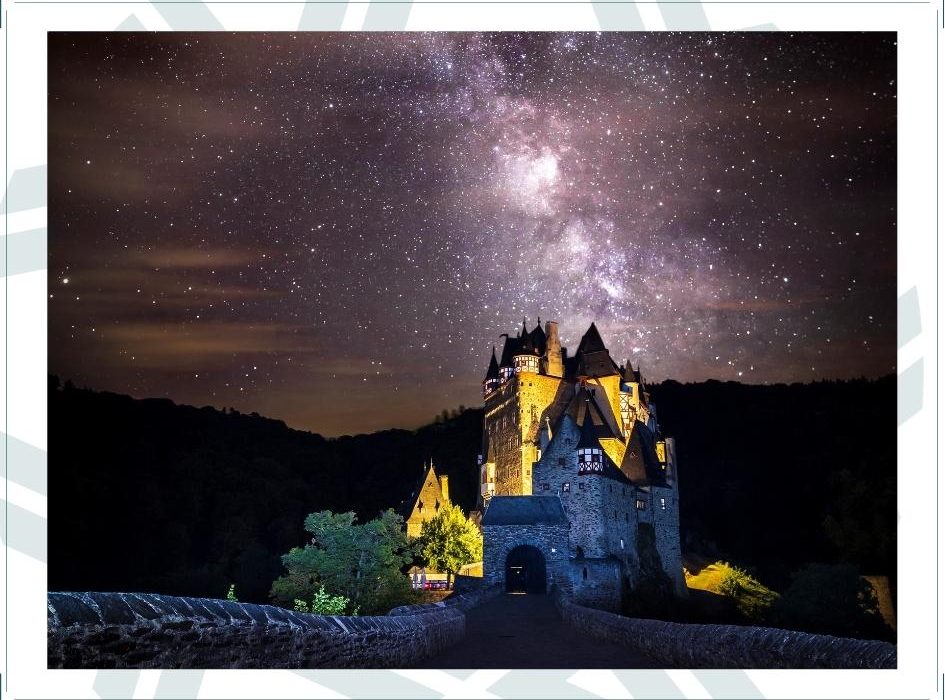
 Star trails / star circles

The rotation of the earth combined with slow shutter speeds creates a creative effect. The stars then turn into stripes! Also called star trails. The longer the shutter speed, the longer those stripes will become. If you are going to photograph star trails, you may want to keep your ISO low to avoid noise as much as possible.

You can use your BULB function to take one long shot of 30 minutes or longer to generate beautiful streaks.

You can also take several shots and merge them later in post-processing. The number of shots should certainly be around 100, which you later merge. Shutter speeds of 30 seconds to a minute per exposure are recommended.

Other tips: 

  • Always photograph on a tripod
  • Focus manually
  • Turn off the image stabilization on your lens
  • Use a remote control or the camera's self-tim
  • Set your interval timer if your camera has it. Do include the processing time of the recording. Every camera has a processing time after taking a slow shutter speed shot. Set your interval so that your camera has time to process the shot.

Want to learn photography or brush up on your own photography skills?

Sign up for one of the many workshops!

Till clicks!


Photography Tips

Taking a good photo? Here's what you need to know!

What kind of photographer are you?

It is good to first know what kind of photographer you are. There are several options that are broken down into 4 categories. 

The biological photographer, has a great interest in photographing certain animal or plant species and knows the name of many species.

The technician opens the box of tricks and knows how to get the most out of his camera and also derives satisfaction from this.

The Artist, approaches it from the artistic side and attempts to give it a twist that can be compared to art.

The philosopher, thinks carefully about how best to photograph the subject and excels by photographing it in a different way. 

After you have determined what kind of photographer you are. You can start looking at how to take the best photo.

What is important in taking a good photo?

Besides operating the camera, there is another thing that is incredibly important when taking a good picture.

Yes, the composition.

Composition is the correct placement of the subject in your photo, with the goal of forming a beautiful whole. 

From where you take the photo, the point of view: perspective is very important for the photo. Take a few steps to the left or right and see what that means for your photo. 

There are two well-known perspectives in the photography world:

Bird's eye perspective 

Like being a bird looking down on its subject from the sky. Despite that this does not necessarily mean that it must always be photographed from high in the sky. The subject can also just be on the ground, as long as it is photographed from above. This often makes the subject smaller and the horizon higher in the picture.

Frog perspective 

Easily put, it means "from a frog's point of view." A frog sits low on the ground and thus looks at the world from below. This point of view often makes the subject appear larger and the horizon often light lower in the picture.

And then of course you have:

Photographing at eye level. This is self-explanatory, photographing from your own point of view. Different compositions and frames can influence the photo, positively and negatively. It is important that you experiment with this and test out different viewpoints when taking a good photo.

Want to learn photography or brush up on your own photography skills?

Sign up for one of the many workshops!

Till clicks!


Photography Tips

Photography with filters

The advantages of shooting with filters!

Shooting with filters may not be something you immediately think of, but it gives a very nice effect!

No, no filters for the photos, as with Instagram, for example, but actual filters for your lens. There are different types, shapes and sizes and they all have matching quality.  An important rule for the purchase of filters: do not skimp on this. Cheaper filters are often not colorfast, you get strange colors in your photo that do not belong there. The quality is also significantly less, which means that they wear out or break faster. So, invest in the right equipment if you want to get started with filters. 

Moving on to filters, we now discuss the most commonly used filters. 

* UV filters

The UV filter is one of the most commonly used filters. It has a visible effect in conditions where a lot of UV light is present. This includes areas high above sea level. UV filters are now also used to protect the lens from scratches. 

* Protection filters

These are specially made to protect the front lens element. These are often slightly more expensive than a UV filter and are made of a clear and more color neutral type of glass. Do you need a UV or protection filter?  Not necessarily, but it's cheaper to replace a filter than a lens.

* Polarizing filters

A polarizing filter consists of two parts, by turning the front part of the filter you determine which light the filter lets through. It is possible to give a photo extra contrast or to reduce reflections. Well-known examples for the use of a polarizing filter are the removal of reflections in windows, water or other reflective subjects. But also making the sky bluer or the grass greener. 

The use of a polarizing filter can also have drawbacks. Because a polarizing filter only allows light in a specific direction, less light will come in overall. The amount of light that comes in can be 1 to 2 stops less with a polarizing filter!

* ND Gradient Filters

Gradient filters are widely used for landscape photography. Since you want to see enough detail in light and dark parts. Installing a gradient filter eliminates the need to compromise between chewed-out skies and deep black shadows.

* ND filters

ND stands for Natural Density, also often called Gray filter in Dutch. An ND filter is a dark piece of glass that blocks the incoming light. The filters are available in different strengths. There are filters that only block a fraction of the light, to filters that block up to 10 stops of light! This makes it possible to freeze water and create fairytale images with slow shutter speeds. It is also a godsend if you want to shoot with a large aperture when there is too much light. Then you make the environment darker with an ND filter.  

Filters sometimes also have drawbacks. In some cases you don't want to use of a UV or protection filter. When shooting against a light source, the filter may reflect light and show this in the photo as a lens flare. In this case, it is wise to temporarily remove the filter from the lens.

Do you want to know more about filters? Or how do you use filters?

Workshop photography with filters

We have several photography workshops, where you can ask anything and learn a lot. Feel free to take a look between the various workshops, ask your question or register directly for the workshop 'shooting with filters'

Till clicks!

News

Hidden Gems of Iceland

Last week I returned from my scout trip to Iceland. And today I can finally share the beautiful hidden gems and must sees I found for our upcoming photography trip. I am beyond excited to share my findings with you. 

To find the hidden gems we take the highland route, this is an off road route that is only accessible in July and August. This road will take you to the most beautiful places far away from the tourist hotspots. 

Fagradalsfjall Volcano

We start with the Fagradalsfjall Volcano. This volcano is currently active. If the volcano is still active during our trip we will make sure to pay a visit.

Gullfoss Falls

Gullfoss Falls is one of Iceland’s most iconic and beloved waterfalls. Hidden in the Hvítá river canyon. The waterfall has two stages. The first stage is 11 meters, whilst the second drop is 21 meters. The canyon walls on both sides of the waterfall reach heights of up to 70 meters.

Nýifoss

The Nýifoss waterfall was formed in 1939. Nýifoss is quite different from most waterfalls people like to visit. Because the water is 100% glacial water it is colored with mud, clay, dirt and all kinds of soil that the melting ice carries from under the glacier. The whole surrounding is like being in a desert or on the moon, but with a lot of water. All the different colors and structures make Nýifoss worth a visit.

Kerlingarfjöll

Kerlingarfjöll is one of the places that is only accessible in July or August. Kerlingarfjöll is a 150 km² volcanic mountain range in the highlands of Iceland. In the middle of this mountain range is the small but beautiful geothermal area Hveradalir where it steams everywhere, mud pools boil and the mountains glow orange-brown. All the different colors, structures and layers make Kerlingarfjöll worth a visit. 

Hveravellir

Hveravellir is an geothermal area and has been called the most beautiful geothermal area in Iceland. With it’s multi-coloured boiling mud pools, fumaroles and beautiful hot springs, will Hyeravellir take your breath away.

Kolugljúfur Canyon

The Kolugljúfur is a canyon in the North of Iceland. This canyon is more then 1 kilometer long and 50 meter deep. In the beginning the Víðidalsá falls through the Kolufossar, and downstream there is another waterfall. Finally, the river ends in the lagoon lake Hóp.

Hvitserkur

Hvitserkur is a 15 m high basalt stack along the eastern shore of the Vatnsnes peninsula, in northwest Iceland. The rock has two holes at the base, which give it the appearance of a dragon who is drinking.It’s a beautiful photographic location. 

Goðafoss Waterfall

This spectacular waterfall is another highland route location. Goðafoss Waterfall is also known as the “Waterfall of the Gods.” Some believe that the name comes from the fact that the waterfall is god-like in beauty. The water of the river Skjálfandafljót falls from a height of 12 metres over a width of 30 metres. The river rises in the Icelandic highlands and runs through the Bárðardalur valley. 

Some of you may know the Dettifoss waterfall. Known as the strongest waterfall of Iceland. Dettifoss being the strongest waterfall makes it very touristic. In my opinion the Goðafoss Waterfall is even more beautiful and unique in its kind. 

Mývatn

Mývatn is one of my favourite places to visit. Mývatn is a lake situated in an area of active volcanism in the north of Iceland.The lake provides a number of waterbirds, especially ducks. The lake was created by a large lava eruption 2300 years ago, and the surrounding landscape is dominated by volcanic landforms. In my opinion definitely worth your visit. 

Námafjall

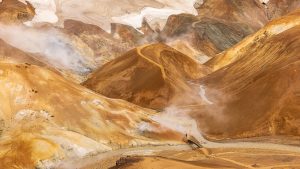
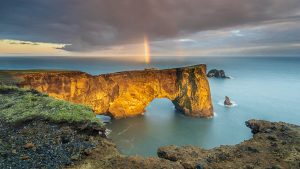
Námafjall is our second geothermal area. At this area you will see many smoking fumaroles and boiling mud pots, surrounded by sulphur crystals of many different colours.The gigantic size of the mud craters is what makes you go ‘wow’ at the sight of them.

Stuðlagil Canyon

Stuðlagil Canyon can be found in East Iceland in the Glacier Valley called Jökuldalur. With the largest number of basalt rock in Iceland and a stunning blue glacier river, Stuðlagil is one of Iceland’s hidden gems. The basalt rocks make it such a unique and special place to visit. 

Diamond Beach

Our trip continues towards the south of Iceland, passing the east Fjorden. Making a stop at the Diamond beach. The name says it all. At the Diamond Beach, the icebergs wash up on shore, creating a beautiful contrast with the black sand. This makes it the perfect location for photographers. Wildlife-enthusiasts also frequent the site as many seals call the beach home, and it is one of the best places in the country to see orcas from the shore.

Svinafellsjokull

Svínafellsjökull is connected to diamond beach and is the largest ice cap in Europe. Svínafellsjökull is part of the Skaftafell Nature Reserve, a place of popularity amongst hikers, photographers, and those with a passion for raw natural beauty.

Sólheimajökulll

Sólheimajökull is a glacier in southern Iceland, between the volcanoes Katla and Eyjafjallajökull. Part of the larger Mýrdalsjökull glacier. It embodies the frozen beauty of Iceland with its vivid blue tones and mountainous backdrop.

Reynisdrangar

Reynisdrangar are basalt sea stacks situated under the mountain Reynisfjall in southern Iceland. It is framed by a black sand beach that was ranked in 1991 as one of the ten most beautiful non-tropical beaches in the world.

Dyrhólaey

Dyrhólaey is a natural arch located on the south coast of Iceland. It was formerly an island of volcanic origin. The volcano erupted about 100 thousand years ago. The broad view makes it the perfect photographic location.

Sólheimasandur Plane Wreck

Sólheimasandur Plane Wreck is a remainder of a 1973 U.S. Navy DC plane that crashed on black sand. It is a popular photography location. To make it unique I want to incorporate night photography to make it a unique capture.

Skógafoss

We will finish the trip at the beautiful Skógafoss waterfall. Its located on the Skógá River in the south of Iceland at the cliff marking the former coastline. The Skógafoss is one of the biggest waterfalls in the country, with a width of 25 metres and a drop of 60 m. Due to the amount of spray the waterfall consistently produces, a single or double rainbow is normally visible on sunny days.

News

Trip Ireland and Northern Ireland 2021

It has been some time since we traveled somewhere outside The Netherlands. The time has come, and we are preparing a photography trip to Ireland and Northern Ireland in 2 months. So exciting to visit this incredible country again, gather unforgettable memories and return with stunning photographs.

Ireland and Northern Ireland in 2021

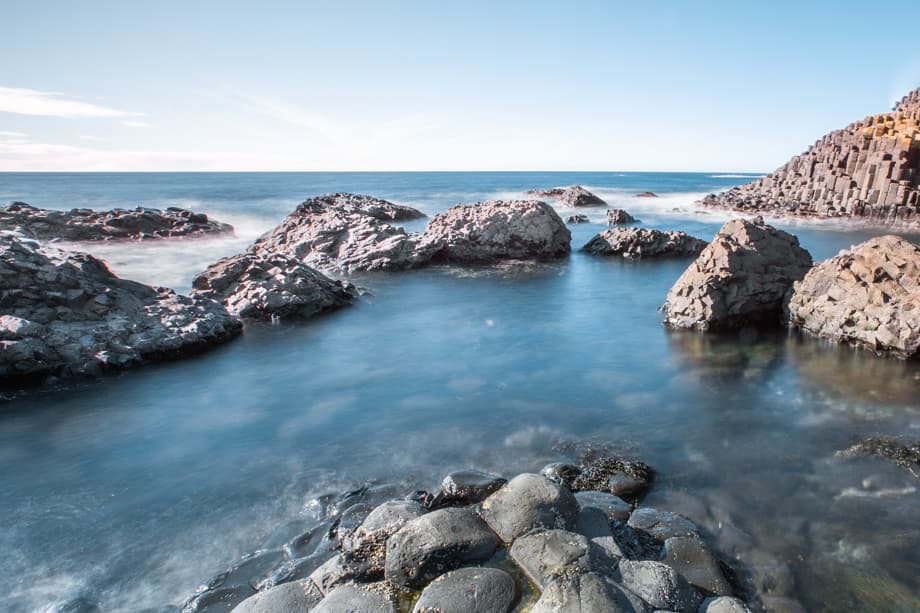
During the trip, we will visit the Republic of Ireland and Northern Ireland, which is part of the United Kingdom. We wanted to capture the best of both. Even though they are located on the same island, there is a great contrast between the two. This island is abounding with great variety. From the hills to the seacoast, the landscapes within the country are breathtaking. Many historic buildings, cathedrals, or ruins are some of the highlights. It is a truly magical spectacle to experience all of it and see it through the lenses of your camera. Can’t wait?… The dates are from 6th to 13th August.

The program

This photography trip will be 8 days filled with joy, excitement, happy memories, and most importantly great photography. We have selected the best highlight from both worlds so you can enjoy every aspect of these countries. People, architecture, nature, history, you ask for it, it is all in the package. Your guide will be Mark Brands, all-time photography and travel enthusiast.


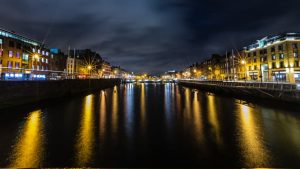
We are flying to Dublin and start the journey from there. Dublin is the capital of the Republic of Ireland, which has impressive historical architecture. Great for some city photo shoots and especially when the sun is down, we can capture the vibrant colors of the city at the night. Moreover, we are heading to the beautiful wild nature. Breathtaking views, from cliffs, waterfalls, all from the east to the west coast.

And last but not least, there is a bonus. Do you know that part of one of the most famous series is filmed in Ireland? Well, we will visit some of the film sets of Game of Thrones, which are Dark Hedges, Inch Abbey, Tollymore Forest Park, and Murlough Bay.


Covid-19

Republic of Ireland and Northern Ireland are considered as yellow code countries due to the Covid-19 pandemic. Just in a few weeks, it is expected to open fully for visitors from other European countries. Therefore, vaccination is not mandatory to travel to Ireland. However, still, all passengers will be asked to provide proof of negative PCR test by entry. In case you have finished the full cycle of the vaccination process, you won’t be asked to present a negative PCR at arrival, only the proof documents from the vaccination.

We are extremely happy to travel again and welcoming everyone who wants to join. Click here and save your place for this incredible journey. This is an adventure to memorize and learn more about the beauty of photography. Don’t miss out!

Is another photography trip also on your bucket list? Then check out the package of photo trips and tours. Or read about the different destinations in one of the blog.Would you rather photograph in the Netherlands? That is also possible! Feel free to check out the various photography workshops.

News

Nairoshi foundation – a good cause

This week we want to present one incredibly good cause for the people of Kenya or more specific the Maasai culture. Kenya is one of our favorite destination countries, so rich and colorful. So, we think it is important to know more about the culture itself and the Nairoshi foundation, which supports the young population of the country.

Maasai culture

The Maasai culture is practiced in the biggest part of Kenya. These indigenous inhabitants are spectacular to watch and explore their way of living. They are differentiated by their clothing and the popular traditional dances. Big groups of tourists are rarely accepted near these villages. That is how the Maasai kept their authenticity and live their lives as they want.

However, during my visit, I was well accepted and lived for a couple of weeks in one of those villages and get to know the culture. I spent the time at the Nairoshi Foundation, so I was within the locals. I learned so much about the lifestyle and the challenges of the Maasai people. Families usually have multiple children, and the conditions are not the highest. Most of the time families don’t have enough resources to send all of their children to get a proper education.  The lack of support has great consequences. They go to school for some time and then stop.

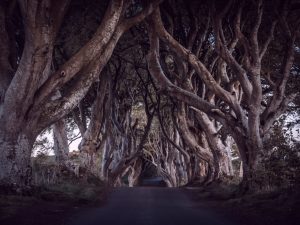
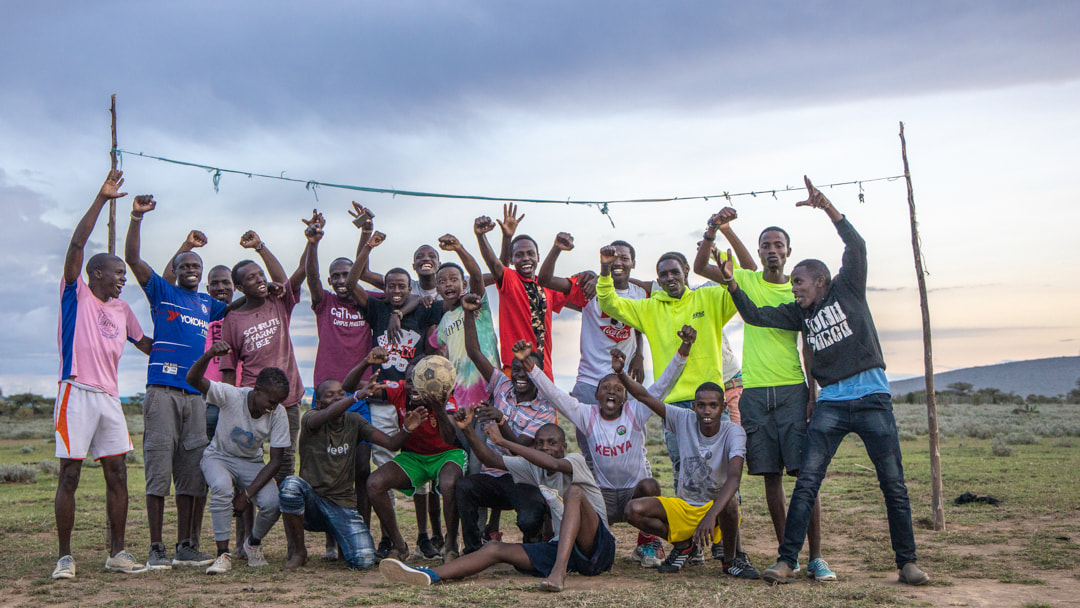
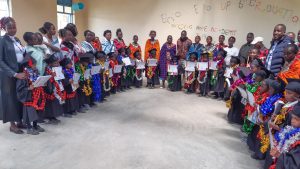
There is a gap between high school and college when the education is paid, and most families cannot afford that. Usually, young girls are arranged for marriage and to have children. Here comes the Nairoshi Foundation which supports the younger population of Kenya to be more educated and have a choice of different opportunities.

Nairoshi foundation

The Nairoshi Foundation is an organization in Kenya that is supporting the younger generation of the county to get a proper education. They often stop going to school at a young age around 13 tears old. The Nairoshi Foundation is rewarding these kids with entering and graduating higher education levels like high school. They are supported by donations and sponsors who are willing to give enough to change their lives and give them more opportunities.

Their mission is to support families living in hard conditions and change their lives and futures for the better. The projects of the foundation are all community-based. They are focused to improve the quality of life of the Maasai people in southern Kenya. There are three main projects at the moment. The Maasai widow program supports women in hard times. It is hard for them to support their children on their own so they are usually forced to stop their children from school so they can help the family. Therefore, the Nairoshi Foundation accepts these children to gain higher education as well as provide employment opportunities for widowed women.

Another project is the ‘Hope’ Academy which is a school build by the foundation to ensure education for children who don’t have access to such a ‘privilege’. Last but not least, they support students or young children through their academic development. After they finish the Hope Academy these children get support and the resources to go to high school and university. The Nairoshi Foundation is supporting numerous boys and girls to pursue their dream careers and get more future opportunities for success.

Better life

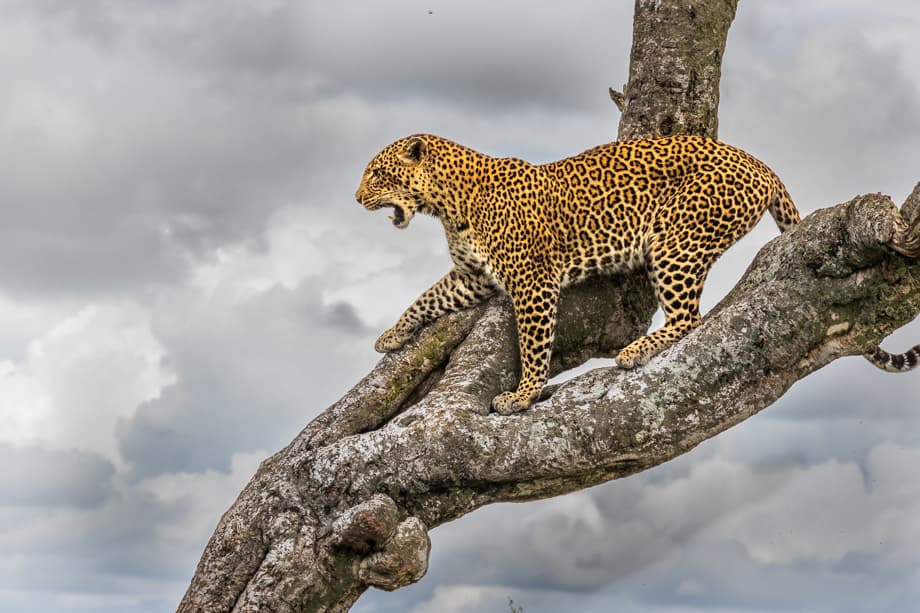
Kenya is one of our greatest photography destinations. We all love the landscapes, the culture and locals, and it’s wonderful wildlife. So Travelmarks Photography is supporting organizations like the Nairoshi Foundation that can improve the way of living in the country. Their mission is a great cause that needs to be followed. We want to see this better future for the children and  to make sure they have options in life like more career opportunities. Many girls are dragged to marriage and early pregnancy which can be changed. You can easily donate any resources so they can fulfill their dreams or become a sponsor which means that you will support a child in need through its education like high school and university. Together we can do it possible for many more young children of Kenya.

1 2 3 4 5 6
Privacy en cookies
We gebruiken cookies om uw ervaring tijdens het gebruik van onze website te verbeteren. Als u onze Services via een browser gebruikt, kunt u cookies beperken, blokkeren of verwijderen via de instellingen van uw webbrowser. We gebruiken ook inhoud en scripts van derden die mogelijk trackingtechnologieën gebruiken. U kunt hieronder selectief uw toestemming geven om dergelijke insluitingen van derden toe te staan. Raadpleeg onze Privacy en cookies voor volledige informatie over de cookies die we gebruiken, gegevens die we verzamelen en hoe we ze verwerken.
Youtube
Consent to display content from Youtube
Vimeo
Consent to display content from Vimeo
Google Maps
Consent to display content from Google
Spotify
Consent to display content from Spotify
Sound Cloud
Consent to display content from Sound