
Lightroom mask
 Using the 'mask' function in Lightroom, it becomes very easy to select a subject in your photo and then edit it. The program can even automatically recognize and select subjects quite accurately, which saves a lot of time in manual selection. In this item we give you some tips on how to use this feature and all its tools.
Tips on masking in Lightroom
- To keep an overview when using different masks, it is useful to give each mask a name. Right-clicking on the mask title will bring up the option to rename it.
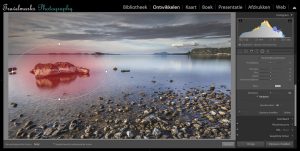
- As mentioned earlier, it is therefore possible for Lightroom to select the subject itself. Of course it remains possible to make the necessary adjustments yourself with the 'add' and 'remove' functions. This can be done with different tools, such as a brush, linear or radial gradient. The area you select and adjust will turn red.
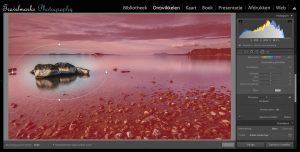
- Selecting the sky can now also be done automatically, which is ideal for landscape photography. This is also done very accurately, but this can also be adjusted manually. If you want to assign a different color to the editing area, click on the color box and choose your desired color. You can also turn off the editing area by unchecking 'Show overlay'. With the hotkey 'O' you can easily turn it on and off.

- With the brush you have a lot of freedom to edit specific parts of the photo. Selecting the brush already brings up a whole menu of settings and effects to choose from. The keyboard shortcut for the brush is the 'K' on the keyboard. With the feather you can choose how soft the transition will be. The larger the feather, the softer the transition.
- The linear gradient, formerly known as a graduated filter, works as follows. While holding down the 'shift' key, use the left mouse button to draw a line from top to bottom so that the linear gradient appears. The radial gradient works much the same, where you work with a circle to select a certain area.
- If you scroll down in the mask menu, you will arrive at the color range. If you click on this you will get the option to click on a color in the photo with an eyedropper. The adjustment now only takes place over similar colors in the photo. With 'HSL color' you adjust all color tones across the entire photo, here you have more control over the editing area.
- Finally, the option to hide masks is also available in Lightroom. That way you don't have to permanently remove a mask, but you can temporarily hide it. Right-clicking on the mask brings up the 'hide' option.
 Want to learn to photograph or gain experience?
Would you like to participate in one of the many workshops to learn more about your camera or image editing? Then sign up for one of our workshops. Would you rather join a multi-day photography trip? Then there is plenty of choice from our photo trips. It is also possible to order the ebook Lightroom Classic so you can get started yourself.
Till clicks!